
I’ve been wanting to build a stand-alone analog synthesizer using the TI SN76477 integrated circuit since I was fourteen years old. Back in 1978 that’s when Texas Instruments released the “complex sound generator” that was used in the Space Invaders arcade g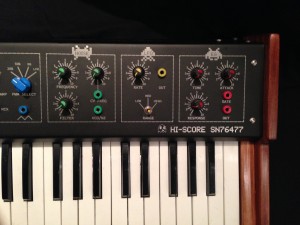 ames to make the sounds of ships, aliens, music and photon blasters. I bought my chip at Radio Shack and along with Forrest Mims’ III “Engineer’s Notebook”, also from Radio Shack. I was able to breadboard a number of the demo circuits to make some interesting sound effects. There were siren, helicopter, gunshot and organ circuit examples on the datasheet.
But beyond simple sound effects and organ tones created by using different resistor values to get the right voltages to generate musical “tonal” notes, building something as complicated as a monophonic analog synthesizer was beyond my skill as a newbie just learning about electronics.
So in 2006 when Thomas Henry developed and published in concert with Scott Stites a complete circuit that could play a five octave musical scale in addition to the wide variety of sounds the SN76477 chip was capable of, I knew I had to give it a try. I bought a bare circuit board in 2010 from Synthcube but never got around to buying the parts and populating it until this Spring. There were two issues. I wasn’t sure how I wanted to use the circuit Build it as a module as one part of a larger moduluar synth or build it as a stand alone unit? And also, I didn’t have a place to work. So I had a puzzle to solve.
The answer came this Spring. Working at Washington University, I learned about the Techshop – a makerspace chain that the University partners with. I took a tour and decided to join. Part of what convinced me to join was seeing, the potential to complete a project like this because of how well outfitted it was. The reason I hadn’t built the circuit when I bought the board was I didn’t have a place to safely solder. With the Techshop, I had an electronics bay, woodshop, metalshop and more.
I began building the circuit in May and started to think about how I would build a case with a rescued keyboard and a panel similar to the ones used with the SNVOICE circuit but laid out in a stand-alone way rather than modular style. I started making drawings and doing some research on legacy original analog synthesizers.
 (click the image for a closer view)
Serendipitously, in June I learned that Techshop St. Louis was sponsoring a Maker Faire over the summer to celebrate its 1 year anniversary. Members were offered a chance to earn three months additional membership by choosing a project that would make good use of the Techshop facilities and community and would commit to finishing it in time for a Maker’s Showcase. I decided to commit to the case as my project. It took about two months to design and build and I learned so much doing it, it felt like a great opportunity.
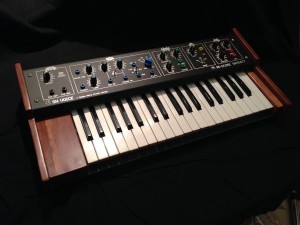
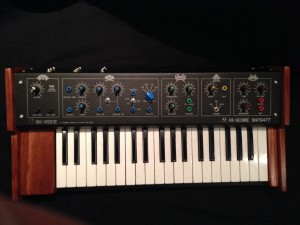
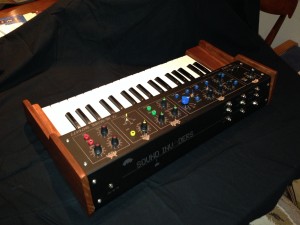
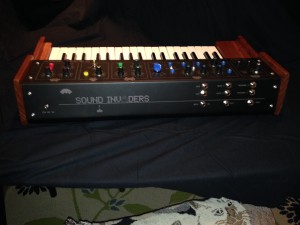
I chose an old school look to match other analog monophonic synths of the day. The Moog MG-1 was probably the most influential being the Moog that was sold by Radio Shack and the one I had the most contact with. To make the case I used basic materials. The base of the case is made from plywood. Powder-coated aluminum sheet metal provides the substrate for the control panel. And solid pine side panels brings the base and control panel together. The keyboard was rescued from an old reed organ I found on Craigslist for 10 dollars.
Here’s the list of Techshop classes that were required to complete this project:
• Woodshop SBU: WOD101
• Jointer, Planer, Router SBU: WOD201
• Basic Metal Shop SBU: MTL103
• Angular Sheet Metal SBU: MTL105
• Laser Cutting and Etching SBU: LAS103
• Sand Blasting and Powder Coating SBU: FAB106
Now I’m ready to wire the board to the panel controls and test the circuit. I’ve been waiting for this day for decades now. I’m pretty excited. I bought the electrical components from Mouser, Digikey, Tayda and Synthcube. I added an MFOS keyboard controller and MFOS wall-wart power supply. I’ll post an update here as well as sound samples once it’s up and running. Here are a few more pictures to round out this post:
Leave a Reply
You must be logged in to post a comment.